Let’s be honest, we’ve all been there. It’s the first truly hot day of the year, you flick on your trusty fan, and instead of a refreshing breeze, you get a face full of… well, last year’s dust. That caked-on layer of gray gunk isn’t just an eyesore; it’s a performance killer and an allergen-slinger. Knowing How To Clean Dusty Fan Blades properly is one of the most essential, yet often overlooked, home maintenance tasks. It’s the secret to better air circulation, improved energy efficiency, and a healthier breathing environment.
I remember one particularly sweltering summer when my pedestal fan just wasn’t cutting it. The motor was whirring, but the air felt stagnant. A quick glance at the blades revealed the culprit: they were so coated in dust they looked like they were wearing fuzzy gray sweaters. After a thorough cleaning, the difference was night and day. The fan was quieter, the breeze was stronger, and the room felt instantly cooler. This guide is built on that experience, designed to turn your dusty, underperforming fan back into the cooling champion it was meant to be.
Why Should You Bother Cleaning Your Fan, Anyway?
Before we dive into the “how,” let’s talk about the “why.” It’s more than just aesthetics. A clean fan is a happy, efficient fan.
- Improved Airflow and Cooling Performance: Think of a fan blade like an airplane wing. Its specific shape is designed to slice through the air and push it forward. When that shape is distorted by a thick layer of dust, its aerodynamic properties are compromised. The fan has to work harder to move less air, resulting in a weaker breeze.
- Better Indoor Air Quality: That dust isn’t just inert fluff. It’s a lovely cocktail of skin cells, pollen, pet dander, and other allergens. When you turn on a dirty fan, you’re essentially launching those particles right back into the air you breathe.
- Increased Energy Efficiency: When the blades are heavy with dust, the fan’s motor has to work overtime to spin them at the correct speed. This extra strain consumes more electricity, subtly bumping up your energy bill. A clean fan is a more energy-efficient cooling solution.
- Longer Fan Lifespan: The extra strain on the motor doesn’t just use more power; it also generates more heat and causes more wear and tear over time. Regular cleaning reduces this strain, helping to prolong the life of your appliance.
Safety First: Pre-Cleaning Essentials
Before you touch a single dusty blade, let’s get the prep work out of the way. This is non-negotiable.
- Unplug the Fan: This is the golden rule. Never attempt to clean any electrical appliance while it is plugged into a power source. It’s not just about the blades accidentally starting; it’s about preventing any risk of electric shock.
- Gather Your Tools: You don’t need a professional kit. Most of what you need is probably already under your sink.
- A screwdriver (usually a Phillips head)
- Microfiber cloths or old rags
- A mild soap or dish detergent
- A bucket or basin of warm water
- An old toothbrush or small cleaning brush
- A can of compressed air (optional, but very helpful)
- A vacuum cleaner with a brush attachment (optional)
A Step-by-Step Guide on How to Clean Dusty Fan Blades
Different fans require slightly different approaches. We’ll break down the process for the most common types you’ll find in homes, from the classic pedestal fan to the mighty ceiling fan.
How to Clean a Pedestal, Box, or Desk Fan
This is the most common type of fan, and thankfully, it’s usually the easiest to deep clean.
- Disassemble the Cage (Grille): Most fans have clips or a few screws holding the front and back grilles together. Carefully undo the clips or use your screwdriver to remove the screws. Set them aside in a safe place so you don’t lose them!
- Remove the Blade Assembly: Once the front grille is off, you’ll see a cap in the center of the blades, usually threaded onto the motor shaft. Unscrew this cap. Remember: most fan caps are reverse-threaded, meaning you’ll turn it clockwise to loosen (“righty-loosey”). Gently pull the fan blades straight off the motor shaft. Some models may have a small screw on the back of the blade hub that needs to be loosened first.
- Wash the Removable Parts: Take the grilles and blades to a sink or bathtub. Give them a good wash with warm, soapy water. Use an old toothbrush to get into the tight corners of the grilles where dust loves to hide. Rinse everything thoroughly and set them on a towel to air dry completely. Crucially, they must be 100% dry before reassembly.
- Clean the Fan Body and Motor Housing: While the parts are drying, turn your attention to the rest of the fan. Use a damp microfiber cloth to wipe down the fan base, stand, and motor housing. Never spray water or cleaner directly onto the motor housing. Use a can of compressed air or a vacuum with a brush attachment to blow dust out of the motor vents. This is key for preventing overheating.
- Reassemble: Once every part is bone dry, carefully reassemble the fan in the reverse order you took it apart. Put the blades back on, tighten the center cap (remember, “lefty-tighty” for most), and re-secure the grilles.
Expert Tip: According to Maria Chen, a Home Appliance Maintenance Specialist, “The most common point of failure in a household fan is a burnt-out motor caused by overheating. Regularly cleaning the dust from the motor vents is just as important as knowing how to clean dusty fan blades themselves.”
How to Clean a Ceiling Fan Without a Mess
Cleaning a ceiling fan can feel like a recipe for a dust storm in your living room. Here’s how to do it cleanly and safely.
- Prepare the Area: Lay an old sheet or newspaper on the floor and any furniture directly beneath the fan. This will catch any dust that falls.
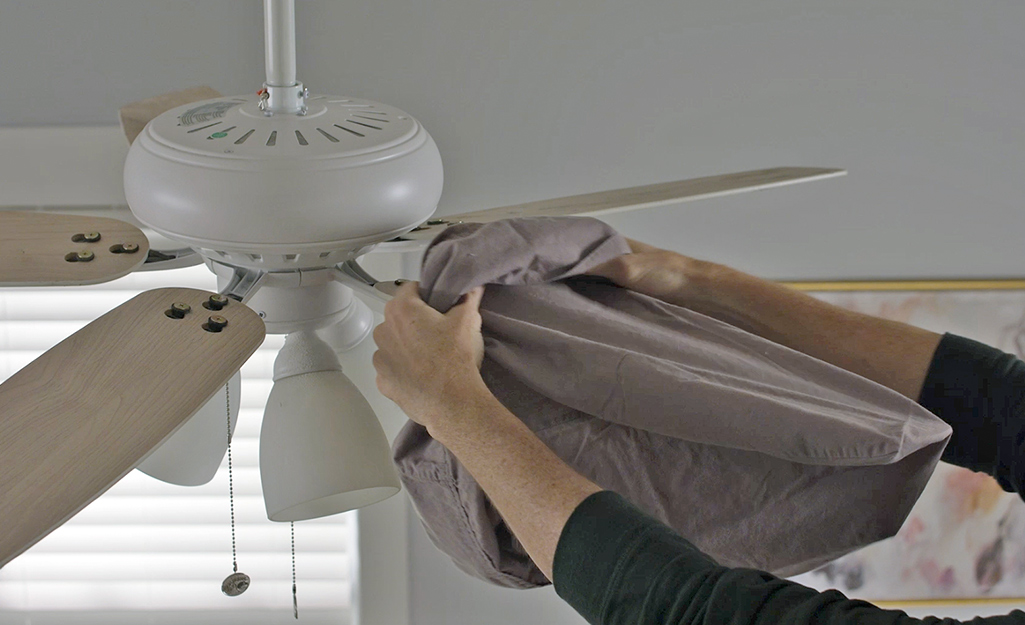
- The Pillowcase Trick (The Best Method): This is a game-changer. Grab an old pillowcase you don’t mind getting dirty. Standing securely on a stepladder, place the pillowcase over one of the fan blades, enclosing it completely. Then, slowly and firmly, pull the pillowcase back towards you. The dust and grime will be trapped inside the pillowcase instead of raining down on you. Repeat for each blade.
- Final Wipe-Down: After the pillowcase trick, there might be some stubborn grime left. Use a damp microfiber cloth to give each blade a final wipe. Don’t forget to wipe down the light fixture and the central motor housing as well.
How to Clean a Tower Fan
Tower fans are fantastic for their space-saving design, but their grilles can be tricky to clean.
- Exterior First: Start by using your vacuum’s brush attachment to go over the entire exterior, paying special attention to the air intake and outtake vents. This will remove the majority of the surface-level dust.
- Compressed Air is Your Best Friend: This is where a can of compressed air really shines. Direct the nozzle at the grilles and blow the internal dust out. It’s best to do this outdoors or in a well-ventilated area to avoid blowing dust all over your room.
- Deep Clean (If Possible): Some tower fan models allow for partial disassembly. Check your user manual. If you can safely remove the outer casing, you can access the internal cylindrical blades for a more thorough wipe-down with a damp cloth. If not, the vacuum and compressed air method is your best bet.
Fan Maintenance Checklist for Longevity
Cleaning is just one part of keeping your fan in top shape. Here’s a quick checklist to follow:
- [ ] Monthly Quick Clean: Use a duster or vacuum brush attachment to do a quick pass over the grilles and blades.
- [ ] Quarterly Deep Clean: Perform a full disassembly and wash (as described above) at least once every 3-4 months, or more often if you have pets or allergies.
- [ ] Check for Wobbles (Ceiling Fans): While cleaning your ceiling fan, gently check if the blades feel loose. Tighten any screws at the base of the blade arms if needed.
- [ ] Listen for Strange Noises: Grinding or rattling sounds can indicate a problem with the motor or a loose part. Address it before it becomes a bigger issue.
Frequently Asked Questions (FAQ)
Q1: How often should I clean my fan blades?
A: For optimal performance and air quality, a quick dusting or vacuuming should be done every two to four weeks. A deep clean, involving disassembly, is recommended every three to six months, depending on how dusty your environment is (e.g., if you have pets, live near a construction site, or suffer from allergies).
Q2: Can I use a vacuum cleaner to clean dusty fan blades?
A: Absolutely. A vacuum cleaner with a soft brush attachment is excellent for a quick clean. It’s a great way to remove loose surface dust from the grilles and blades without having to take the entire fan apart.
Q3: Is it safe to use harsh chemicals or sprays to clean my fan?
A: It’s best to avoid them. Harsh chemicals can damage the plastic or finish on your fan blades and grilles. A simple solution of warm water and mild dish soap is all you need. Never spray any liquid directly on the motor housing.
Q4: My fan is still weak after cleaning. What could be the problem?
A: If you’ve thoroughly cleaned the blades and motor vents and the fan is still underperforming, the issue might be mechanical. It could be a failing motor or a problem with the capacitor. For more complex issues, you may want to consult our guide on [internal link to troubleshooting common fan problems].
Q5: Will cleaning my fan really help lower my electricity bill?
A: Yes, it can make a noticeable difference over time. A clean fan operates more efficiently, meaning the motor doesn’t have to work as hard to circulate air. This reduced strain translates directly to lower energy consumption, which is good for both your wallet and the environment.
A Breath of Fresh Air
There you have it—a complete playbook on how to clean dusty fan blades for any type of fan in your home. It might seem like a chore, but taking 20-30 minutes every few months to give your fan a proper cleaning is an investment. It’s an investment in better air quality for your family, in the longevity of your appliance, and in the simple, satisfying comfort of a powerful, refreshing breeze on a hot day. So go on, give your fan the TLC it deserves. You’ll be breathing easier—and cooler—in no time.