Ever have that moment mid-summer when you switch on your trusty Vornado, expecting a powerful gust of fresh air, and instead you get a lukewarm puff that smells faintly of… last year’s dust? We’ve all been there. Knowing How To Clean A Vornado Fan is more than just a chore; it’s essential maintenance that restores its legendary performance, improves your home’s air quality, and honestly, just makes your room feel a whole lot better. Vornado isn’t just any fan; it’s an air circulator, and keeping its unique vortex-creating parts pristine is key to unlocking its full potential.
Why Cleaning Your Vornado is Non-Negotiable
Before we roll up our sleeves, let’s talk about the “why.” A Vornado fan works differently from a standard fan. Instead of just blowing air at you, it creates a powerful, swirling vortex of air that circulates and moves all the air in the room. Think of it like a silent, tireless air-stirring machine.
However, when dust, pet hair, and other household gunk build up on the blades and inside the grille, a few bad things happen:
- Reduced Airflow: The meticulously engineered blades can’t move air efficiently when they’re weighed down by grime. That powerful vortex becomes a weak whimper.
- Poor Air Quality: The fan starts circulating dust particles instead of just air, which can be a nightmare for anyone with allergies.
- Increased Noise: An imbalanced or dirty blade can cause a rattling or humming sound, disturbing the peace and quiet.
- Motor Strain: Over time, a clogged fan forces the motor to work harder, potentially shortening its lifespan and increasing energy consumption.
Cleaning isn’t just about aesthetics; it’s about performance, health, and protecting your investment.
Getting Started: Your Vornado Cleaning Toolkit
The good news is you don’t need a professional cleaning crew. Most of what you need is probably already in your house.
- A Phillips head screwdriver (for most models)
- A vacuum cleaner with a brush attachment
- A soft cloth or microfiber towel
- Mild dish soap and a bowl of warm water
- An old toothbrush or a small, soft brush
- Optional: A can of compressed air for hard-to-reach spots
Expert Tip: John Anderson, a certified HVAC technician, advises, “The biggest mistake people make is using harsh chemical cleaners on their fans. These can damage the plastic and leave a residue that attracts more dust. Mild soap and water are all you need for a safe and effective clean.”
The Step-by-Step Guide on How to Clean a Vornado Fan
Ready to bring your Vornado back to life? Let’s do this. The process is straightforward and should take you less than 30 minutes.
- Safety First: Unplug the Fan!
This isn’t a suggestion; it’s the most important step. Never attempt to clean any electrical appliance while it’s plugged in. Disconnect it from the wall outlet completely. - Removing the Front Grille
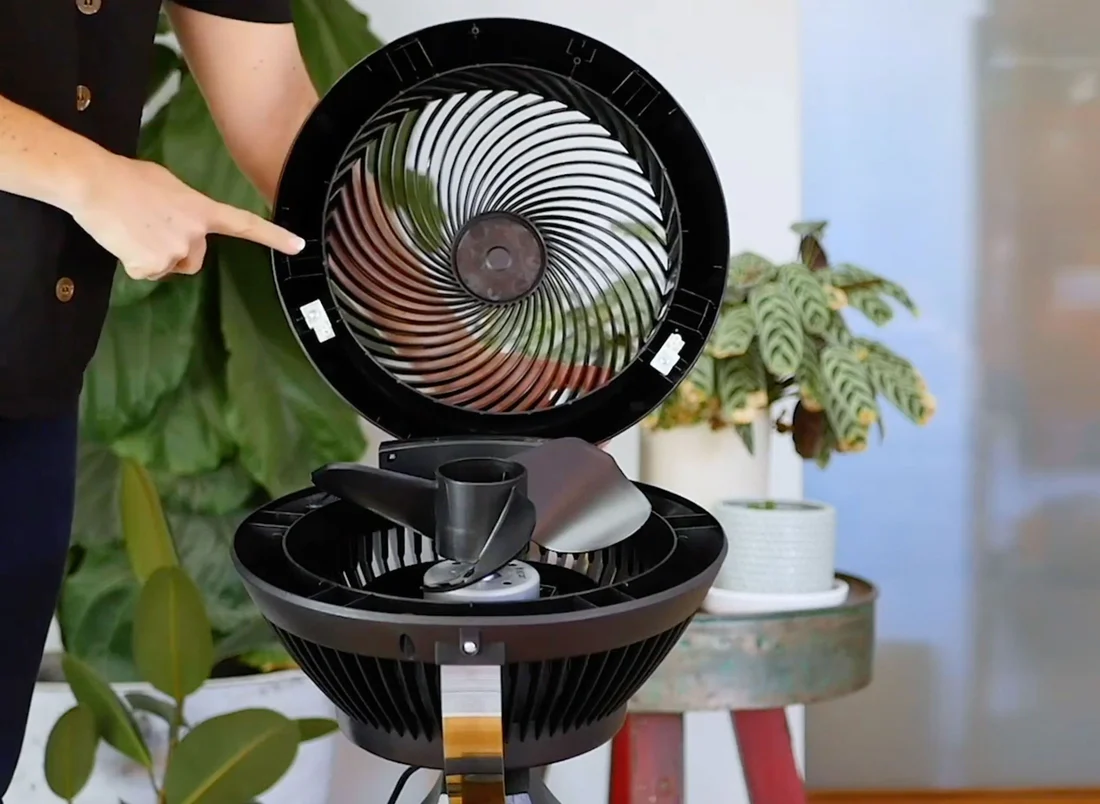
This is where Vornado’s design really shines. Most models are designed for easy cleaning. Lay the fan down on a towel to protect your surfaces.- For models with clips: Look for three or four clips around the perimeter of the grille. Gently push or pull these clips to release the front grille. You might need to give it a slight twist.
- For models with screws: You’ll typically find three or four screws located on the back of the fan, around the outer edge of the air inlet. Use your Phillips head screwdriver to remove them. Keep the screws in a small bowl so you don’t lose them!
- Cleaning the Grille
Once the front grille is off, take it to the sink. You can wash it with warm, soapy water. Use an old toothbrush to gently scrub away any stubborn grime stuck in the vents. Rinse it thoroughly and set it on a towel to air dry completely. Crucial note: Make sure it’s 100% dry before reassembly. - Cleaning the Fan Blades and Interior
Now you have clear access to the heart of the machine: the blades.- Start by using your vacuum’s brush attachment to suck up all the loose dust and hair from the blades and the interior housing. This will do most of the heavy lifting.
- Next, dampen your soft cloth with a little bit of water (and maybe a drop of soap). Wring it out so it’s damp, not soaking wet. Carefully wipe down each blade, front and back.
- Wipe down the inside of the fan’s body as well. Never spray water or cleaner directly into the fan or near the motor housing.
- Cleaning the Rear Grille and Exterior
Use your vacuum brush to clean the air inlets on the rear grille. This is where the fan pulls air in, so it’s often quite dusty. Finish by wiping down the entire exterior of the fan with your damp cloth. - The Grand Reassembly
Once everything is clean and completely dry, it’s time to put it back together.- Align the front grille with the clips or screw holes.
- If you have clips, press firmly until you hear them snap securely into place.
- If you have screws, re-insert them and tighten them until they are snug. Don’t over-tighten, as this could crack the plastic.
Plug it back in, turn it on, and feel the difference. You’ve just mastered how to clean a Vornado fan.
What If My Vornado Fan Can’t Be Disassembled?
Some Vornado models, particularly certain tower fans or older designs, are not meant to be taken apart. Don’t worry, you can still give them a solid cleaning. For a deep dive into different models, check out our [guide to the best tower fans of the year].
For non-removable grilles, your best friends are a vacuum and compressed air.
- Unplug the fan. (Yes, we’re saying it again!)
- Use your vacuum’s brush and crevice tools to remove as much dust as possible from the outside of the grilles.
- Take the fan outside or to a well-ventilated area. Use short bursts of compressed air to blow the remaining dust out from the inside. Direct the air from the back to the front to push the dust out the way it came.
- Follow up with one last vacuuming session to catch any dislodged dust.
Frequently Asked Questions (FAQ)
How often should I clean my Vornado fan?
For optimal performance, a light dusting and vacuuming every couple of weeks is great. A deep clean, as described above, should be done at least twice a year—once before you start using it for the season and once before you store it away. If you have pets or live in a dusty area, you might want to do it quarterly.
Can I wash the Vornado fan blades in water?
No. The blades are directly attached to the motor shaft. You should never submerge the main body of the fan or allow water to get into the motor. Wiping them with a damp cloth is the safest and most effective method.
What’s the best way to get rid of a musty smell from my fan?
A musty smell is usually caused by dust and moisture. The deep cleaning process outlined in this guide on how to clean a Vornado fan should eliminate the odor. Ensure all parts are completely dry before reassembly to prevent any mildew from forming.
My Vornado fan is making a rattling noise after I cleaned it. What’s wrong?
The most common cause is that the front grille is not seated properly. Unplug the fan and double-check that all clips are securely fastened or that all screws are tightened evenly. An unbalanced buildup of remaining dirt on one blade could also cause a wobble, so ensure they are uniformly clean.
Is it safe to use a leaf blower to clean my fan?
While tempting, it’s not recommended. The high-powered air from a leaf blower can be too strong and may damage the delicate fan blades or force dust deeper into the motor housing, causing more harm than good. Stick to a vacuum and canned air for a safer approach.
A Breath of Fresh Air
Taking a few minutes to clean your fan properly is one of the most satisfying home maintenance tasks you can do. The payoff is immediate: stronger airflow, quieter operation, and cleaner air filling your room. By following these steps, you’ve not only learned how to clean a Vornado fan, but you’ve also extended the life of one of the best air circulation tools on the market. Now, go enjoy that powerful, refreshing breeze you’ve been missing.