Remember that glorious feeling when you first unboxed your tower fan? The whisper-quiet hum, the powerful stream of cool air cutting through a stuffy room on a hot summer day. It was perfect. But lately, has that gentle hum turned into a bit of a rattle? Does the breeze feel… well, a little less breezy? If you’re nodding along, I’ve got a secret for you: the solution is probably simpler than you think. Learning How To Clean A Tower Fan is the single best thing you can do to restore its power, quiet its operation, and improve your home’s air quality.
It’s a task many of us put off. I get it. Last summer, my own trusty tower fan started making a strange whistling sound. I ignored it for a week until I finally noticed the air circulation just wasn’t cutting it anymore. A quick peek with a flashlight revealed the culprit: a thick blanket of dust and pet hair clogging the intake vents. It looked like a tiny, fuzzy sweater had taken up residence inside. Don’t let your fan get to that point! Let’s dive into the simple process of bringing your fan back to its former glory. It’s easier than you think, and the payoff in performance is huge.
Why Bother Cleaning Your Tower Fan Anyway?
Is it really that big of a deal? In a word, yes. A clean fan isn’t just about aesthetics; it’s about performance, safety, and even your health. Think of it like the air filter in your car or home AC system—when it gets clogged, everything else has to work harder and less efficiently.
- Improved Airflow and Cooling: This is the most obvious benefit. Dust, pet dander, and other airborne gunk build up on the internal impeller blades, restricting their movement and blocking the grilles. A clean fan moves significantly more air, which means better cooling and improved air circulation throughout your room.
- Better Air Quality: Your fan circulates the air you breathe. If it’s caked in dust and allergens, it’s just blowing those particles right back into your living space. Regular cleaning helps reduce allergens in the air, which is a game-changer for anyone with allergies or respiratory sensitivities.
- Increased Energy Efficiency: When the motor has to fight against the resistance of built-up grime, it draws more power to achieve the same result. A clean, freely spinning fan motor is a more energy-efficient motor, which can translate to small but welcome savings on your electricity bill.
- Longer Lifespan: Dust is the enemy of electronics. It can cause the motor to overheat, putting unnecessary strain on its components. Keeping the motor and vents clear of debris is one of the easiest ways to extend the life of your cooling solution.
“A tower fan’s motor is designed for a specific workload. When you add the resistance from dust and debris on the blades, you’re essentially forcing it to run uphill constantly. This leads to premature wear and potential failure.” – Sarah Jenkins, Appliance Maintenance Specialist
Before You Begin: Safety and Tool Prep
Ready to get down to business? Great! But before we start, let’s get our ducks in a row. A little preparation makes the whole process smoother and, more importantly, safer.
The golden rule of cleaning any electronic appliance is simple: unplug it first. Seriously. This isn’t just a friendly suggestion; it’s a non-negotiable safety step to prevent any risk of electric shock or the fan accidentally turning on while you’re working on it.
Here’s a quick checklist of the tools you’ll likely need:
- A Phillips head screwdriver (check your fan’s screws, as some may vary)
- A can of compressed air
- A vacuum cleaner with a brush and crevice attachment
- A soft-bristled brush (an old toothbrush or a paintbrush works great)
- A microfiber cloth
- A small bowl for screws (trust me on this one!)
How to Clean a Tower Fan: The Ultimate Step-by-Step Guide
Tower fans can seem a bit intimidating because their blades are hidden away. Unlike a traditional pedestal fan, you can’t just pop off a single cage. But don’t worry, there are a couple of great methods depending on how deep a clean you need.
Method 1: The No-Disassembly Quick Clean
This method is perfect for routine maintenance every two to four weeks, especially during peak season. It won’t get every last speck of dust, but it will keep the worst of it at bay.
- Safety First! Unplug your tower fan from the wall outlet.
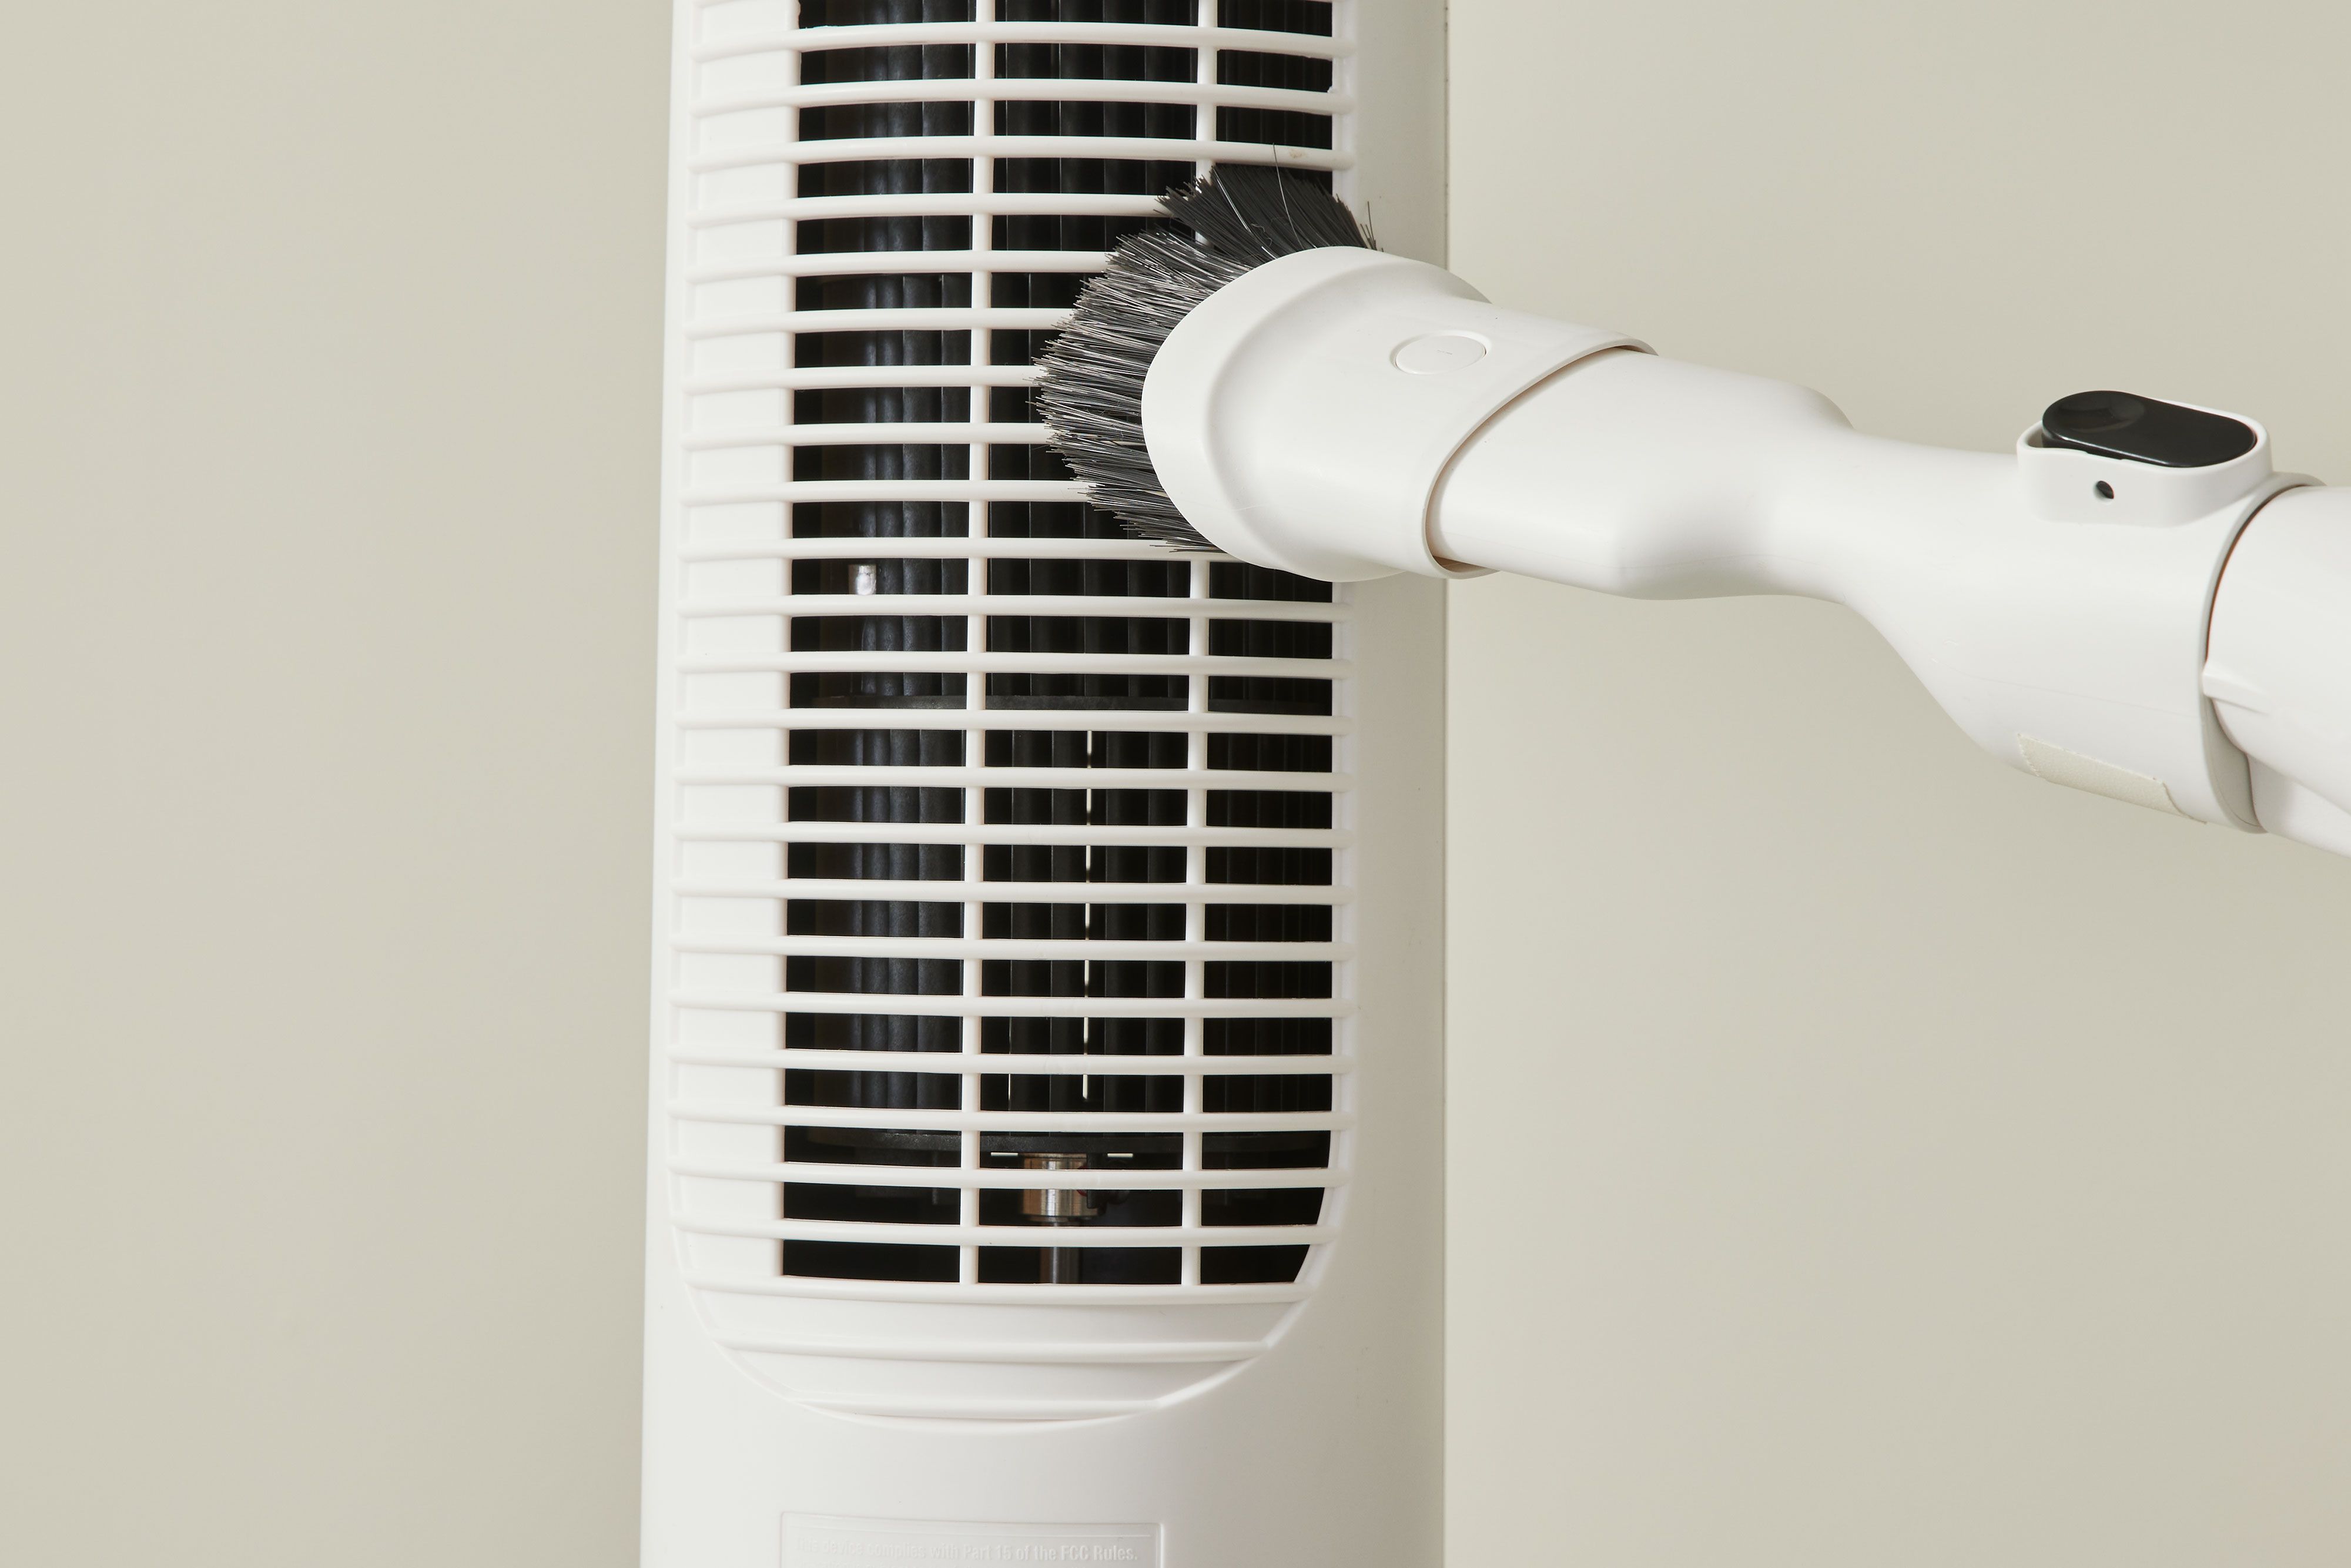
- Vacuum the Exterior: Using the brush attachment on your vacuum cleaner, go over the entire exterior of the fan, paying close attention to the front and back grilles (the air intake and outlet vents). This will suck up all the surface-level dust.
- Blast with Compressed Air: Take the fan outside or to a well-ventilated area. Hold the can of compressed air upright and use short, controlled bursts to blow dust out from the inside of the grilles. Work from the top down. You’ll likely see a cloud of dust emerge, which is a good sign!
- Final Wipe-Down: Use a slightly damp microfiber cloth to wipe down the entire exterior casing and base. Make sure the cloth is only damp, not wet, and avoid getting any moisture near the control panel or motor housing.
Method 2: The Deep Clean (Disassembly Required)
For a truly thorough cleaning once or twice a year, you’ll want to open it up. This lets you get directly to the impeller blades, which is where the most stubborn grime builds up. Always check your user manual first, as disassembly steps can vary between brands like Dyson, Lasko, or Honeywell.
- Unplug and Prepare: Disconnect the fan from the power source and lay it down on a soft surface, like a towel or blanket, to prevent scratching.
- Locate and Remove Screws: Look for the screws that hold the main body of the fan together. They are usually located on the back or bottom of the unit. Carefully remove them with your screwdriver and place them in your small bowl so they don’t get lost.
- Gently Separate the Casing: Once the screws are out, you should be able to gently pry the two halves of the plastic casing apart. Be patient and work your way around the seam. There may be plastic clips holding it together, so don’t force it.
- Access the Impeller Blades: With the casing open, you’ll have a clear view of the long, cylindrical “blades” (technically an impeller). They will likely be coated in a layer of dust.
- Clean the Interior: Now for the satisfying part.
- Use your vacuum’s crevice tool to remove the large clumps of dust from the blades and the inside of the housing.
- Follow up with your soft-bristled brush to dislodge any stuck-on grime from the nooks and crannies of the blades.
- Wipe the blades and the inside of both casing halves with a damp microfiber cloth.
- Reassembly: Once everything is clean and completely dry, carefully snap the casing back together. Re-insert and tighten all the screws you removed. Don’t overtighten them, as you could crack the plastic.
- Final Test: Plug the fan back in and turn it on. You should immediately notice a stronger airflow and a quieter, smoother operation. Congratulations on a job well done!
How Often Should You Clean Your Tower Fan?
A good rule of thumb is to perform a quick clean every 2-4 weeks and a deep clean every 3-6 months, but your mileage may vary.
You should clean your fan more frequently if you:
- Have pets that shed
- Live in a dusty environment or near a construction site
- Have household members with allergies or asthma
- Run the fan 24/7
Common Cleaning Mistakes to Avoid
Learning how to clean a tower fan is also about knowing what not to do. Avoid these common pitfalls to protect your appliance.
- Never Use Water Directly: Do not spray water or cleaning solutions directly into the fan. Moisture can damage the motor and electronic components, creating a serious safety hazard. Always use a lightly damp cloth.
- Don’t Forget to Unplug It: We’ve said it before, but it’s worth repeating. This is the most critical safety step.
- Forcing Parts Apart: If the casing won’t come apart easily, double-check for a hidden screw you might have missed rather than using brute force.
- Using Harsh Chemicals: Abrasive cleaners or strong solvents can damage the plastic finish of your fan. A little water or a mild soap solution on a cloth is all you need.
Frequently Asked Questions (FAQ)
Q1: Can I clean a tower fan without taking it apart?
Yes, absolutely. For regular maintenance, using a vacuum cleaner with a brush attachment on the outside vents, followed by a can of compressed air to blow dust out from the inside, is very effective.
Q2: Will cleaning my tower fan make it quieter?
In most cases, yes. A lot of the rattling or whistling noises from a fan are caused by an imbalanced buildup of dust on the blades or debris interfering with its rotation. Cleaning it often restores it to near-silent operation.
Q3: How do I clean a tower fan that I can’t open?
Some modern tower fans are designed as sealed units. For these models, the “No-Disassembly” method is your best bet. Rely heavily on a powerful vacuum to pull dust out through the grilles and use compressed air to dislodge anything stubborn inside.
Q4: Is it safe to use a leaf blower to clean a tower fan?
While tempting, it’s not recommended. The force from a leaf blower can be too strong, potentially damaging the delicate impeller blades or forcing dust deeper into the motor housing where it can cause more harm.
Q5: How long does it take to clean a tower fan?
A quick clean should only take about 5-10 minutes. A full deep clean, including disassembly and reassembly, might take around 30-45 minutes, depending on your fan’s model and how dirty it is.
Breathe Easy and Stay Cool
There you have it—a complete playbook on how to clean a tower fan. It’s one of those simple home maintenance tasks that offers an immediate and satisfying reward. You’ll not only enjoy a more powerful and efficient cooling solution but also contribute to a healthier, less dusty home environment. So next time you feel that breeze starting to weaken, you’ll know exactly what to do. Take 30 minutes, give your fan the care it deserves, and it will thank you with many more seasons of cool, refreshing air.