Let’s be honest, we’ve all been there. The summer heat is creeping in, you switch on your trusty fan for that first refreshing breeze of the season, and… a puff of dust fills the air. You look closer and see it: a winter’s worth of grime caked onto the blades and grille. The thought of finding a screwdriver, wrestling with tiny screws, and keeping track of all the parts is enough to make you sweat. But what if I told you there’s an easier way? Learning How To Clean A Fan Without Taking It Apart is a game-changer, saving you time and hassle while restoring that glorious, clean airflow. It’s a simple skill that keeps your home’s air quality better and your cooling solution running efficiently.
Why Bother Cleaning Your Fan, Anyway?
Before we dive into the “how,” let’s quickly cover the “why.” It might seem like just a cosmetic issue, but a dusty fan is more than just an eyesore. Think of your fan as the lungs of your room’s air circulation system. When it’s clogged, it can’t breathe properly.
- Improved Air Quality: A dirty fan doesn’t just move air; it circulates dust, pollen, pet dander, and other allergens around your room. Cleaning it means you’re breathing cleaner, healthier air.
- Better Performance and Energy Efficiency: Layers of dust on the blades create drag. This forces the motor to work harder to spin the blades, which reduces airflow and consumes more electricity. A clean fan is a more powerful and energy-efficient fan.
- Increased Lifespan: An overworked motor is a hot motor. Over time, the strain caused by dust buildup can lead to premature burnout. Regular cleaning is one of the best forms of [preventative maintenance for your home appliances].
- Noise Reduction: That annoying whirring or rattling sound? Sometimes it’s just the sound of imbalanced blades, weighed down by clumps of dust. A quick clean can often make your fan significantly quieter.
Your No-Disassembly Fan Cleaning Toolkit
The good news is you probably already have everything you need right at home. No special equipment required.
- An old towel or newspaper to protect your floor.
- A vacuum cleaner with a brush and crevice attachment.
- A can of compressed air (like the one for keyboards) or a leaf blower on its lowest setting.
- A soft cloth or microfiber duster.
- A bottle of all-purpose cleaner or a simple solution of vinegar and water.
- A plastic bag (for a specific box fan trick we’ll get to!).
How to Clean a Fan Without Taking It Apart: Step-by-Step Methods
Ready to get that fan looking and feeling brand new? Here are a few tried-and-true methods. Always remember to unplug your fan from the power source before you start any cleaning! Safety first, always.
Method 1: The Blow and Vacuum Combo
This is the quickest and most popular method for a fan with light to moderate dust buildup. It’s perfect for a monthly touch-up.
- Prep Your Area: Lay down your old towel or newspaper underneath the fan to catch any falling dust.
- Blow Out the Dust: Grab your can of compressed air or your leaf blower (on low!). Hold it a few inches from the back of the fan grille and spray in short, controlled bursts. Work your way from top to bottom, forcing the dust out through the front grille. You’ll see a cloud of dust emerge—that’s a good thing!
- Vacuum the Debris: Use your vacuum’s brush attachment to suck up all the dust that was just dislodged. Go over both the front and back grilles thoroughly. Use the crevice tool to get into any tight spots or vents on the motor housing.
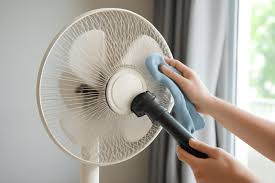
- Final Wipe-Down: Lightly dampen a microfiber cloth with your all-purpose cleaner and wipe down the exterior of the fan, including the base and stand. This will pick up any remaining fine dust particles.
Method 2: The “Big Bag” Trick for Box Fans
This is a brilliantly simple and surprisingly effective method specifically for box fans. It uses the fan’s own power to help with the cleaning.
- Spray the Grille: Lightly mist the front and back grilles with your all-purpose cleaner or vinegar solution. Don’t soak it, just a light spray to help the dust clump together. Let it sit for a minute.
- Bag the Fan: Get a large plastic garbage bag and carefully slide the entire box fan inside. Make sure it’s big enough to not be taut against the blades.
- Turn It On: Plug the fan in and turn it on high for about one minute. The force of the air and the cleaner will dislodge the grime from the blades, which will then fly off and stick to the inside of the bag.
- The Reveal: Turn the fan off, unplug it, and carefully remove it from the bag. You’ll be amazed at how much gunk is left behind in the bag! Give the outside a final wipe-down.
“A common mistake people make is using too much water. You never want to spray liquids directly into the motor housing. The ‘Big Bag’ method is clever because it uses minimal moisture and maximum airflow to do the job safely.” – John Anderson, HVAC Specialist
Special Tips for Different Fan Types
Not all fans are created equal. Here’s how to adapt these methods for different designs.
Tower Fans
Tower fans can be tricky due to their long vertical vents. The compressed air and vacuum method is your best bet here. Use the vacuum’s crevice tool to get deep inside the vents, running it up and down each slit. You may need to do this several times to get it all.
Pedestal or Standing Fans
These are the easiest to clean with the no-disassembly method. The blow and vacuum combo works perfectly. Pay extra attention to the motor housing at the back, as this is where dust loves to collect and can cause overheating.
Ceiling Fans
For a ceiling fan, a specialized duster with a long, extendable pole is a lifesaver. Look for one with a U-shaped head that cleans both the top and bottom of the blade simultaneously. If you don’t have one, the old “pillowcase method” works wonders:
- Slide an old pillowcase over a blade.
- Press down gently with both hands.
- Slowly pull the pillowcase back towards you. All the dust and debris will be trapped inside the pillowcase instead of falling on your floor and furniture.
When a Quick Clean Isn’t Enough
While learning how to clean a fan without taking it apart is fantastic for regular maintenance, there comes a time when a deep clean is unavoidable. If the grime is thick, greasy (like in a kitchen), or if the quick-clean methods just aren’t cutting it, it’s time to break out the screwdriver. For a full breakdown of that process, check out our [complete guide to deep-cleaning your fan]. As a rule of thumb, a quick clean should be done monthly during peak season, with a full disassembly clean once a year.
Frequently Asked Questions (FAQ)
Q: How often should I clean my fan without taking it apart?
A: For a fan you use daily, a quick clean every 2-4 weeks is ideal. This prevents heavy buildup and keeps the air quality in your home high. If you have pets or live in a dusty area, you might want to do it more often.
Q: Can I use cleaning wipes to clean my fan?
A: Yes, cleaning wipes are great for the exterior surfaces like the base, stand, and the outside of the grille. However, they aren’t effective for cleaning the blades inside without disassembly. Stick to air and vacuum power for the interior.
Q: Is it safe to use a leaf blower to clean an indoor fan?
A: It is, but with caution! Always use it on the lowest possible setting and be prepared for a significant amount of dust to be blown out. It’s best to do this in a well-ventilated area or even take the fan outside on a porch or balcony for the “blowing” step.
Q: Will cleaning my fan really help with my allergies?
A: Absolutely. Fans are notorious for collecting and redistributing common household allergens like dust mites, pollen, and pet dander. A clean fan circulates cleaner air, which can make a noticeable difference for allergy sufferers.
Q: What’s the best way to clean the tiny vents on a tower fan?
A: For tower fans, compressed air is your best friend. Follow it up with a vacuum cleaner that has a long, thin crevice tool. For stubborn spots, a bottle brush or a pipe cleaner can help dislodge debris from inside the vents.
A Breath of Fresh Air
There you have it—a complete guide on how to clean a fan without taking it apart. It’s a simple chore that pays huge dividends in performance, air quality, and the longevity of your cooling solution. By spending just ten minutes every month, you can ensure your fan runs quietly and efficiently, providing a truly refreshing breeze instead of a dusty gust. So go ahead, unplug that fan, grab your vacuum, and get ready to enjoy a breath of fresh, clean air.