Let’s talk about that sleek, bladeless marvel sitting in the corner of your room. Your Dyson fan is more than just a fan; it’s an air purifier, a high-tech piece of engineering designed to keep your space comfortable and your air clean. But over time, you might notice the air doesn’t feel as fresh, or maybe your allergies are acting up again. That’s your cue. This comprehensive Dyson Fan Filter Replacement Guide is here to walk you through everything, making the process as smooth as the airflow from your machine. Forget calling a technician or feeling intimidated by the manual; we’re going to tackle this together, and you’ll be breathing easier in minutes.
Why Bother Replacing Your Dyson Fan Filter?
Ever wonder what that filter is actually doing all day? Think of it as the unsung hero of your home’s air quality. It’s a microscopic gatekeeper, trapping nasty particles you’d otherwise be breathing in.
A clean filter is crucial for two main reasons: your health and your fan’s health. Over time, the filter gets clogged with dust, pollen, pet dander, mold spores, and even volatile organic compounds (VOCs) from things like cleaning supplies and air fresheners. When it’s full, it can’t trap any more pollutants. Even worse, the fan has to work much harder to push air through the clogged mesh, which can strain the motor and reduce its lifespan. It’s a bit like trying to run a marathon while breathing through a straw – not very efficient!
“A HEPA filter’s performance is directly tied to its condition. A clogged filter not only stops cleaning the air but can also increase energy consumption and put unnecessary stress on the fan’s motor,” states Dr. Alistair Finch, an indoor air quality specialist.
So, a quick filter change isn’t just a chore; it’s an investment in cleaner air and a longer-lasting, more efficient appliance.
How Do You Know When It’s Time for a Filter Change?
Thankfully, Dyson makes this part pretty foolproof. You don’t have to guess or keep a calendar. Your fan is smart enough to tell you when it needs a little TLC.
The general rule of thumb from Dyson is to replace the filter every 12 months, assuming you use it for about 12 hours a day. However, your mileage may vary. If you live in a high-pollution area, have pets, or have a smoker in the house, you might need to change it sooner.
Here’s how to know for sure:
- On-Device Display: Most modern Dyson purifiers have an LCD screen that will show you the remaining filter life and display a notification when it’s time for a replacement.
- The Dyson Link App: If you’ve connected your fan to the app on your smartphone, you’ll receive a notification directly to your phone when the filter life is low. It’s the most convenient way to keep track.
- Reduced Airflow: If you notice the fan isn’t pushing out as much air as it used to, a clogged filter is the most likely culprit.
Finding the Right Filter: A Critical First Step
Before you can start the dyson fan filter replacement guide, you need the right part. Not all Dyson filters are created equal. Using the wrong one can lead to a poor fit, ineffective air purification, and may even damage your machine.
First, identify your Dyson fan model. The model number is usually on a sticker near the base or on the bottom of the unit. Common models include the Pure Cool series (TP01, TP02, TP04, TP07, TP09) and the Pure Hot+Cool series (HP01, HP02, HP04, HP07, HP09).
Here’s a quick breakdown to help you match the model to the filter:
- Dyson Pure Cool TP01, TP02, HP01, HP02, and first-generation Pure Cool Link desk fans: These typically use a single, 360° Glass HEPA filter.
- Dyson Pure Cool TP04, DP04, and Pure Hot+Cool HP04: These models use a two-part filter system: an outer 360° Glass HEPA filter and an inner activated carbon filter. You should always replace both at the same time.
- Dyson Pure Cool TP07, TP09, HP07, HP09, and newer models: These are similar to the TP04/HP04 generation, using a combination of HEPA and carbon filters. The TP09 and HP09 models also include a Selective Catalytic Oxidisation (SCO) filter to destroy formaldehyde, which is designed to last the lifetime of the machine and does not need replacing.
When in doubt, check the official Dyson website or your user manual. It’s better to double-check than to order the wrong part.
Your Step-by-Step Dyson Fan Filter Replacement Guide
Alright, you’ve got your new filter, and you’re ready to go. The whole process should take less than five minutes. Let’s do this.
- Safety First: Power Down! Before you do anything else, turn off and unplug your Dyson fan from the wall socket. This is non-negotiable for your safety.
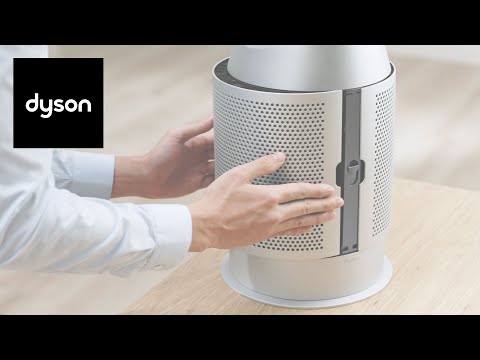
- Release the Shroud/Cover. On most tower models (like the TP and HP series), there are two buttons on either side of the fan, just above the perforated base. Press both buttons simultaneously, and the outer cover (the shroud) will unlatch. Gently lift it straight up and off the base.
- Remove the Old Filter(s). Once the cover is off, you’ll see the old filter(s) sitting inside.
- For models with a single 360° filter, simply lift it out.
- For models with the two-part system (like the TP04/HP04), you’ll first remove the outer HEPA filter. Then, you’ll see tabs on the inner carbon filter; press these tabs to release and remove it.
- A Quick Clean-Up (Optional but Recommended). With the filters out, you have a perfect opportunity to wipe down the inside of the shroud and the base with a dry or slightly damp microfiber cloth. Get rid of any accumulated dust. Never use water or detergents on the main body of the machine.
- Install the New Filter(s). Time for the fresh start!
- If you have a two-part system, start with the inner carbon filter. It will click into place.
- Next, slide the new outer HEPA filter over the top until it sits snugly on the base. Ensure it’s positioned correctly.
- Replace the Shroud. Carefully lower the outer cover back onto the base. It should slide on easily and click securely into place. If you have to force it, something is not aligned correctly. Lift it off and try again.
- Reset the Filter Life Monitor. This is a crucial step that many people forget! If you don’t reset the counter, your fan will keep telling you to replace a filter you just replaced.
- Using the Remote Control: Plug your fan back in and turn it on. Press and hold the “night mode” or “oscillation” button (this can vary by model, so check your manual if unsure) on the remote for about 5-6 seconds. The screen will show a countdown and then display a checkmark or reset to 100%, confirming the reset is complete.
- Using the Dyson Link App: If you use the app, the process is even simpler. Navigate to your device settings, find the filter life section, and you should see an option to reset it.
And that’s it! You’ve successfully completed the Dyson fan filter replacement. Your fan is now ready to get back to work, providing you with powerfully circulated, purified air.
Frequently Asked Questions (FAQ)
Can I wash and reuse my Dyson filter?
No, absolutely not. Dyson HEPA and carbon filters are not designed to be washed. Washing them will destroy the fine mesh of the HEPA filter and ruin the absorbent properties of the activated carbon, making them completely ineffective.
What happens if I don’t change my Dyson filter?
If you neglect to change the filter, your fan’s performance will suffer significantly. It will stop purifying the air, the airflow will weaken, and the motor may become strained, potentially leading to a shorter lifespan for your expensive appliance.
Are cheaper, third-party Dyson filters a good idea?
While third-party filters can be tempting due to their lower price, it’s a bit of a gamble. They may not have the same quality of materials or meet the same strict HEPA standards as genuine Dyson filters, which could result in less effective purification. For guaranteed performance and a perfect fit, sticking with official filters is the safest bet.
Where is the best place to buy a genuine Dyson fan filter?
The most reliable source is the official Dyson website. You can also find them at major authorized retailers like Best Buy, Target, or on Amazon (just ensure the seller is “Dyson” or an authorized dealer).
How much electricity does a Dyson fan use?
Dyson fans are known for their energy efficiency. Compared to traditional air conditioners, their power consumption is very low. Even on the highest setting, a modern Dyson purifier fan uses a fraction of the energy of a small AC unit, making it an excellent cooling solution for circulating air without racking up your electricity bill.
Breathe Easy and Enjoy the Breeze
Mastering the dyson fan filter replacement guide is a simple skill that empowers you to maintain your home’s air quality and get the most out of your investment. It’s a quick, easy task that pays huge dividends in performance and longevity. Now, you can sit back, relax, and enjoy the clean, cool, and quiet comfort that only a well-maintained Dyson can provide.